Thursday, February 24, 2011

A Twist On Some Peanut Butter Favorites

It's a cold day here in New York City. There is some residual snow on the ground awaiting tomorrow's rain which should wash it away. Chris is in California and is preparing to board a Mexican Rivera Cruise tomorrow with his two best guy friends.  So with my boyfriend gone for two weeks with limited contact while abroad, and this seemingly never ending winter outside my door, I turn to baking.

This morning while investigating my pantry, I was delighted to discover that I had everything I needed to make Peanut Butter Thumbprint Cookies.  I decided to do two twists on peanut butter favorites; peanut butter and jelly and peanut butter and chocolate. If you have peanut allergies, I apologize in advance for this post!

Here is my recipe for the cookies which I filled with Raspberry Preserves and also with Nutella.

Ingredients:
Ready to go in the oven
1/2 c. butter, softened 
1/4 c. vegetable oil
2/3 c. white sugar
1/2 teaspoon vanilla extract
2 cups all-purpose flour

a pinch of salt
1/2 c. peanut butter smooth
Nutella and raspberry preserves.


Recipe:
Mix sugar and butter together until smooth, add vanilla and PB, continue beating. Add flour mixture and oil slowly until a dough is formed. 

Roll into small balls in your hands and make a thumb print in the middle. Place each cookie on a cookie sheet and spoon a small amount of nutella or preserves into the thumb print.
Bake at 350* for about 15 mins.


Finished PB&J Cookies
Finished PB & Nutella Cookies

All in a morning's work!


Tuesday, February 22, 2011

American Food Is Back With Mac

I'm celebrating my return to American Grub from French Cuisine with a heaping portion of Mac n' Cheese!

Another confession of mine. I have never successfully made a cheese sauce until today! I was scared out of my mind about attempting it, but after reading the directions about seventeen times to make sure I had it memorized, I braved the world of the unknown... creating a Bechamel sauce.

A Bechamel sauce is a white sauce made from flour, butter, warm milk, salt and pepper. Once you create this, then you add the shredded cheese with the pot off the heat.  Now in years past when I had tried to make this recipe, I always either used milk that wasn't hot enough or had too much heat under the sauce when I stirred in the cheese, or didn't know to use flour and butter. Maybe I didn't whisk it fast enough? Who knows! It was always a separated, odd looking mess! But what I learned today is that creating this cheese sauce was so much easier than I thought. I just needed to follow the steps correctly.

The Mac turned out to be delicious! I used a blend of four cheeses. Gruyere (which is a favorite of mine), Monterey Jack, Fontina (from Italy) and Sharp Cheddar.  I used all but the cheddar for the cheese sauce and then topped the mac with the cheddar once in was in the oven.


Here is the recipe: (adapted from Mr. Geoffrey Kidwell, adapted from Ina Garten)

Ingredients
• Salt 1 tbsp for salting pasta water 1tsp for seasoning
• Olive oil
• 1 pound elbow macaroni, cavatappi or cellentani
• 1 quart milk - That's 4 cups, in case you didn't know.
• 8 tablespoons (1 stick) unsalted butter, divided
• 1/2 cup all-purpose flour
• 12 ounces grated Gruyere, Jack and Fontina cheese grated.
• 8 ounces extra-sharp Cheddar, grated
• 1/2 teaspoon freshly ground black pepper
• 1/2 teaspoon ground nutmeg
• 1 1/2 cups fresh white bread crumbs (5 slices, crusts removed) made in a food processor.

Directions
Preheat the oven to 375 degrees F.
Drizzle olive oil into a large pot of boiling salted water. Add the macaroni and cook according to the directions on the package, 6 to 8 minutes. Drain well.


Meanwhile, heat the milk in a small saucepan, but don't boil it. Melt 6 tablespoons of butter in a large (4-quart) pot and add the flour. Cook over low heat for 2 minutes, stirring with a whisk. While whisking, add the hot milk and cook for a minute or two more, until thickened and smooth. Off the heat, add the Gruyere, Jack and Fontina cheese, 1 teaspoon salt, 1/2 tsp pepper, and 1/2 tsp nutmeg. Add the cooked macaroni and stir well. Pour into a 3-quart baking dish. Melt the remaining 2 tablespoons of butter, combine them with the fresh bread crumbs, and sprinkle on the top. Bake for 10 minutes until bread crumbs brown slightly and then sprinkle the grated cheddar cheese on top. Return to the oven for 20 to 25 mins, or until the sauce is bubbly and the macaroni is browned on the top. YUM!


Monday, February 21, 2011

The Powerful Influence of Chefs Robert Irvine and Anne Burrell

Anyone who knows me, knows that my go-to channel on any given night is the Food Network. I guess the title of this blog should have tipped you off, even if you don't know me.  Chris was resistant at first, or maybe skeptical is the right word? But it wasn't long before he was enjoying shows like Iron Chef America, Chopped, Diners, Drive-ins and Dives and most recently...Worst Cooks In America.

This was the show that I was most surprised to see he enjoyed, but what I came to realize is that he was actually learning along with the contestants. The difference between Chris and I, is that while my fabulous cook of a mother inspired me to want to learn, his fabulous cook of a mother inspired him to want to eat! While both worthy ambitions, it leaves our relationship a bit one-sided when it comes to culinary knowledge.

(Side note: both of our moms make great dishes and I feel very lucky to have some of their recipes in my arsenal!)

While cooking comes naturally to me after years of practice, trial and error and Food TV viewing, Chris loves the idea of cooking, but doesn't always understand the proper techniques to use. For example, cooking everything on high was something he always did. The result one night was dry, caramelized Terriyaki Chicken. He's now learned that cooking meat under a low flame in a nice tasty liquid makes for tender and moist meat! That lesson might have come from me, but let's talk more about the show.

So Worst Cooks In America, if you are unfamiliar is a show hosted and taught this season, by Chefs Robert Irvine of Dinner Impossible and Chef Anne Burrell of Secrets of a Restaurant Chef . The show begins with  a large group of contestants, who are all nominated by a loved one as the worst cooks in America. The show then takes the "recruits" splits the into two teams (one for each chef) and takes them into Food Boot Camp, sending one contestant home each show. In the final round each chef chooses a final recruit to compete in an Iron Chef-like battle.

Each episode however, they learn very basic things. They start with how to make an omelet, or how to cook rice, very basic things that everyone should know how to do. Chris has been really interested while watching the show. His eyes glued to the TV, he often otters a "huh!" or "I had no idea!" or "hmmm". It's music to my ears!  The difference between this show and other cooking shows, is it really breaks it down into basic knowledge and techniques. Instead of saying "braise the pork chop" they'll say "this is how to braise a pork chop" and then show it! It's brilliant.

So thanks to Chef Robert and Chef Anne and all you Food Network Execs for inspiring my man to learn to cook better!

Sunday, February 20, 2011

Equipment Envy

I have a small confession to make. I cook in a kitchen that is the size of a walk in closet. Yep! - I live in New York City. My dream is to one day move to a swanky loft apt where I'll have a bigger kitchen with an island that doubles as counter and eating space.  At present the surface on which I chop, dice and peel is about the size of my laptop. This is not an exaggeration. And while I get by with a little creative ingenuity, it is far from easy. Now this is not to say it will be like this forever. As we have no immediate plans to move, Chris is going to build a counter table that we will all be able to use for cooking! Huzzah!

So I guess on my "To Have" list for the future is a big kitchen, but let's talk about some of the cookware I'm dying to own even before that time arrives.

My number one impending kitchen purchase is a Le Creuset Round Dutch Oven. An absolute classic piece of cookware made of enameled cast iron. This gorgeous piece of equipment can go on stove top, into the oven, or into the freezer and it's fabulous craftsmanship insures an even distribution of heat so that ingredients don't burn, but release all of their natural flavors!
The next piece of equipment no cook could not envy is a KitchenAid Mixer. Another expensive but fabulous investment. This mixer has multiple mixing attachments you can put on to beat, mix and whisk anything to utter perfection! It also has attachments you can buy to make pasta dough and ice cream! It's a home cook's dream!

Moving on! While we have a lovely backyard behind our apt building, (a rare treat that we relish!), the building management does not allow outdoor grills. Such a pity, but there is a remedy for such a conundrum!  Le Creuset Bistro Round Grill Pan! Perfect for grilling in doors or outdoors. 
Who in New York City doesn't like Pizza? And while we can walk three blocks to a great Pizza joint, sometimes it's even more fun to make it yourself. A great Pizza Pan is essential to making a tasty at-home pizza, but a Pizza Stone is far superior! Giving your pizza that "brick oven" taste and crispness to your crust. YUM! Check out this Emile Henry Pizza Stone. 
Le sigh... while it may be years before I own all the fabulous kitchenware I desire, I'll keep browsing William Sonoma online and drooling- I mean dreaming.  Happy Presidents Day, by the way!


Wednesday, February 16, 2011

Channeling Julia Child Part II

Winter Culinary Adventures Part III

1:00pm

Boeuf Bourguignon is simmering away on my stove top right now! I've been cooking since 11am and now it will cook for an hour before I leave for work and then it will cook for another hour and a half tonight before we eat it.

So a few special things about this recipe. If you've seen Julie & Julia, then you know that you have to dry your beef before you saute it, or it won't brown! And you definitely want your meat to have a nice crust on it so that it remains tender in the middle while stewing.

Here is a picture of my meat browning nicely in bacon fat! yum!


Another is that you have to pour in almost an entire bottle of wine to the stew before it cooks. Thank God there are places in NYC that deliver wine at 10:30am and don't think you're an alcoholic! $10 for a bottle of Chianti to arrive at my doorstep in half an hour! Amazing! I love this city!

Here is a picture of my Boeuf Bourguignon ready to begin it's long bath in wine and beef stock.


Now Julia's recipe requires that you cook the stew in the oven for two and a half hours in a Dutch oven in your oven. But sadly, I don't own a Dutch oven yet, so I'm simmering it slowly on the stove in a regular pot. I think it will be fine.  So basically I'm gonna let it cook and then I'll continue this post after I get home from work and we're ready to eat it!

*************
Later That Night:
9:30pm

OMG, People!!

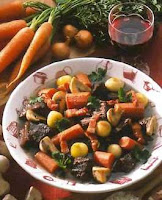
Ok I have just consumed a huge plate of Boeuf Bourguignon! Blogosphere friends, if you are into cooking, even in the slightest, you need to make this dish! It was rich, it was fresh, it was succulent, it was tender. It was amazing! Now keep in mind I've also consumed a couple glasses of wine with the meal, but I highly recommend this one. Even more than Coq au Vin. Here are some pictures of the finished product!


Tuesday, February 15, 2011

Channeling Julia Child

So tomorrow morning I will attempt Julia Child's Bouef Bourguignon, to be cooked in time for an early dinner tomorrow night. It's a bit ambitious I know, but I believe it's time to give it a go. The nice thing about this recipe is it's quite similar to Coq au Vin, so I'm feeling less intimidated than you might think. Also I recently began reading the collection of letters between Julia Child and Avis Devoto as well as "My Life In France" by Julia Child, so I think the time is right!

I know it seems a bit crazy that I've become milding obsessed with cooking gourmet food, but I really think it's about the fact that it's winter. It's cold outside and there are fewer hours of light, so the idea of dining out and eating al fresco is out the window. I have enjoyed cooking hearty dishes that are hot and comfort the winter-worn soul. When Spring and Summer arrive, I know it will be time to make fresh salads and grilled meats, crack open a bottle of Chardonnay and hit our backyard, or Ashley's rooftop down the street. Until that time however, I will continue with my "Winter Culinary Adventures" So Bouef Bourguignon will be "Winter Culinary Adventures Part III".

STAY TUNED! Here's the recipe:


Boeuf Bourguignon 
Ingredients:

   * 6 ounces bacon
   * 1 Tbsp. olive oil or cooking oil *
   * 3 pounds lean stewing beef , cut into 2-inch cubes
   * 1 sliced carrot
   * 1 sliced onion
   * 1 tsp. salt *
   * 1/4 tsp. pepper *
   * 2 Tbsp. flour *
   * 3 cups full-bodied, young red wine , such as a Chianti
   * 2 to 3 cups brown beef stock or canned beef bouillon*
   * 1 Tbsp. tomato paste*
   * 2 cloves mashed garlic*
   * 1/2 tsp. thyme
   * Crumbled bay leaf *
 
Directions
Remove rind from bacon, and cut bacon into lardons (sticks, 1/4 inch thick and 1 1/2 inches long). Simmer rind and bacon for 10 minutes in 1 1/2 quarts of water. Drain and dry.

Preheat oven to 450 degrees.

Sauté the bacon in the oil over moderate heat for 2 to 3 minutes to brown lightly. Remove to a side dish with a slotted spoon. Set casserole aside. Reheat until fat is almost smoking before you sauté the beef.

Dry the stewing beef in paper towels; it will not brown if it is damp. Sauté it, a few pieces at a time, in the hot oil and bacon fat until nicely browned on all sides. Add it to the bacon.

In the same fat, brown the sliced vegetables. Pour out the sautéing fat.

Return the beef and bacon to the casserole and toss with the salt and pepper. Then sprinkle on the flour and toss again to coat the beef lightly with the flour. Set casserole uncovered in middle position of preheated oven for 4 minutes. Toss the meat and return to oven for 4 minutes more. (This browns the flour and covers the meat with a light crust.) Remove casserole, and turn oven down to 325 degrees.

Stir in the wine, and enough stock or bouillon so that the meat is barely covered. Add the tomato paste, garlic, and  herbs. Bring to simmer on top of the stove. Then cover the casserole and set in lower third of preheated oven. Regulate heat so liquid simmers very slowly for 2 1/2 to 3 hours. The meat is done when a fork pierces it easily.

When the melt is tender, pour the contents of the casserole into a sieve set over a saucepan. Wash out the casserole and return the beef and bacon to it. Distribute the cooked onions and mushrooms over the meat.

Skim fat off the sauce. Simmer sauce for a minute or two, skimming off additional fat as it rises. You should have about 2 1/2 cups of sauce thick enough to coat a spoon lightly. If too thin, boil it down rapidly. If too thick, mix in a few tablespoons of stock or canned bouillon. Taste carefully for seasoning. Pour the sauce over the meat and vegetables. Recipe may be completed in advance to this point.

For immediate serving: Cover the casserole and simmer for 2 to 3 minutes, basting the meat and vegetables with the sauce several times. Serve in its casserole, or arrange the stew on a platter surrounded with potatoes, noodles, or rice, and decorated with parsley.

For later serving: When cold, cover and refrigerate. About 15 to 20 minutes before serving, bring to the simmer, cover, and simmer very slowly for 10 minutes, occasionally basting the meat and vegetables with the sauce.

Monday, February 14, 2011

Valentine's Day Pillow Talk

I love Gnocchi.  It is a love that began when I was in High School in South Pasadena, CA when my girl, Vikki and I used to go on dinner dates to Carmines Italian Restaurant. It was she who introduced me to my very first bite of Gnocchi, which I believe, as teenagers we mis-pronounced as "no chi".  Carmines' baked Gnocchi Marinara was incredible and it opened my eyes to a lifelong love for the soft, delicate potato pasta pillows known to Italians as Gnocchi.

Gnocchi loosely translated from Italian means "lumps" and that's kind of a crass-sounding way to explain exactly what they are.  Made from a dough made of cooked potatoes, eggs and flour, Italian chefs form a long thin tube shape from the dough that is then chopped with a knife into small one inch lumps that boil for a quick minute before floating to the top (like ravioli) to announce they are done!

So when Chris and I started dating, we went out for Italian Food on one of our first few dates. It was there at Arte Cafe on the Upper West Side, where I confessed my love for Gnocchi and ordered the dish for my dinner entree. (By the way, Arte Cafe has fabulous Gnocchi if you are ever in the neighborhood.) We also frequent Don Giovanni's Restaurant in our Hells' Kitchen neighborhood, and their Gnocchi Siciliano is fantastic.

After more than a year of dating, it's basically commonplace knowledge in our relationship, that if we dine out for Italian, I'll be ordering Gnocchi, and we'll most likely share it. So for our Valentine's Date, Chris did some research on "NYC's Favorite Gnocchi". He did this more than a month in advance and made a reservation at a small, quaint little Lower East Side Cucina aptly called "Gnocco".

We came to find out after opening the menu that Gnocco is actually a dish made of fried dough and cold cuts, but no matter, it sounded like a place for Gnocchi and that's exactly what we ordered. Along with Beef Spazzatina on a bed of polenta, it was a fabulous and decadent meal for a cold night. YUM!  The gnocchi was fabulous! Soft, buttery, delicate and luscious! Perfect little pillows of potato pasta and now another favorite Gnocchi added to our NYC list!

Here is a picture of the dining room at Gnocco and the contact information below. And if you are daring enough to attempt this pasta on your own, here is Michael Chiarello's recipe for Homemade Gnocchi